A Guide to Produce High-Quality Biochar Production via TLUD Kiln
This article is a complete instruction to produce biochar from biomass like wood or sawdust with qualities suitable for water treatment, cosmetics using a TLUD kiln. Instruction to build the TLUD kiln in a cheap and easy way can be found here.
Materials & Equipment
- Dry clean feedstock
- TLUD kiln (constructed instruction here)
- Lighter, small dry tinder (e.g., paper, twigs)
- Water supply (bucket), containers for washing and rinsing
- Sieve(s) (e.g. 1–2 mm mesh, finer meshes)
- Gloves, safety goggles, mask
- Optional– Scale (to weigh feedstock and char), thermometer or IR thermometer
Key Principles (from literature)
Step-by-Step Procedure
Step 1: Feedstock Preparation
Select uncontaminated wood, sawdust, or biomass of any kind. Dry the material and cut or size into 2–5 cm chunks (for wood) or lightly compacted form (for sawdust). Do not pack tightly.
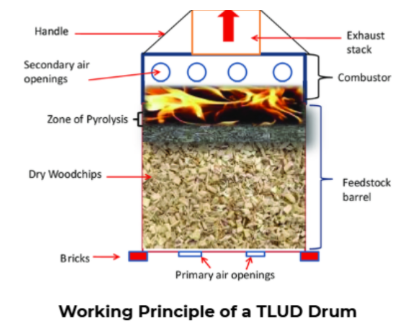
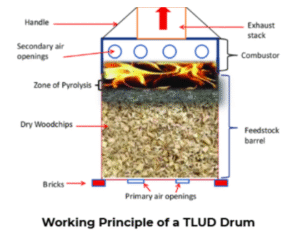
Step 2: Loading the Kiln
Place the TLUD kiln on supports (bricks or stones) so bottom air holes are open. Fill the kiln with feedstock nearly to the top, leaving ~5–8 cm headspace. Ensure even packing.
Step 3: Ignition
Spread a thin layer of dry tinder (leaves, paper) uniformly on top of the biomass. Ignite from the top center. Let flame travel downward. Carefully mount the chimney lid.
You should see smoke initially, then gradually a cleaner flame as gas combustion stabilizes.
Step 4: Pyrolysis
Let the pyrolysis front proceed downward. Monitor flame and smoke: if heavy black smoke persists, airflow or packing is off. Thermometer or IR gun may be used to check surface temperature (aim ~400–600 °C inside).
It can take 30 minutes to 2 hours depending on the biomass.
Step 5: Completion Check
When flame ceases and only smoldering remains, the char front is near bottom.
Test with water: drop small amount on the kiln wall. If a puff of steam appears near bottom, char is still hot; wait until steam appears lower or stops.
Step 6: Quenching
Remove chimney lid carefully (use gloves). Pour plenty of water over the hot char to extinguish all embers. Stir to make sure no hot spots remain and let it cool fully under sealed or covered condition to avoid reoxidation.
Step 7: Drying & Primary Sorting
Spread the quenched char to dry (shade or gentle heat). Break large pieces and sieve with coarse mesh (1–2 mm) to remove big uncharred bits or ash.
Step 8: Washing & Fine Sieving for High-Quality Use
For high-quality uses (water, cosmetics):
- Wash the sieved char in clean water (or mild acid, e.g. 0.05 M acetic acid) to remove soluble ash and salts.
- Rinse repeatedly until the rinse water pH is near neutral and conductivity low.
- Dry again (oven or sun).
- Grind (if needed) and sieve to desired fine size, e.g., <250 µm or <100 µm, depending on application.
Step 9: (Optional) Activation
To increase porosity and surface area (for water adsorption):
Heat the char in inert or low-oxygen conditions at ~700–800 °C with steam or CO₂ for 30 minutes. This is optional and more advanced; many applications work acceptably without this step [4]
Quality Assessment & Use Decision
- Yield measurement (if you weighed feedstock and final char): expect ~25–35% yield by weight under good conditions (TLUD yields may vary) link
- Visual inspection: char should be matte black, brittle, not grey or ashy.
- Float test: good biochar tends to float initially (porous, low density).
- pH of char slurry: near neutral to slightly alkaline (8–10) is desirable.
- Ash content: lower is better for water/cosmetics.
- Adsorption test: small-scale test with dye or heavy metal solution to check removal.
Then decide:
- If quality is high, use in water filters or cosmetics.
- If moderate or variable, you can still use in soil amendment. In soil, you can further “charge” the char by mixing with compost or nutrients before applying [5]
Safety & Notes
- Always wear gloves, goggles, mask when handling char, dust, or during quenching.
- Avoid inhaling smoke or dust.
- Do not open kiln early; char can reignite.
- Quenching must be thorough.
- Control airflow and packing consistency for reproducibility.
Got questions?