Home / Wall Art: Use Old Textiles to Create Fabric-Based Art or Wall Hangings
Wall Art: Use Old Textiles to Create Fabric-Based Art or Wall Hangings
Wall Art: Use Old Textiles to Create Fabric-Based Art or Wall Hangings
Transform textile waste into beautiful fabric-based wall hangings that bring color, texture, and personality to any room. This sustainable, no-sew project lets you repurpose discarded materials while freely exploring patterns, shapes, and colors.
Materials
Old textiles: Use scraps, old clothing, or any fabric that you no longer need. This could be cotton, linen, wool, or any fabric that suits your style.
Scissors: Sharp fabric scissors are essential for cutting fabric into the desired shapes and sizes.
Fabric glue: A strong fabric glue will help to bond your fabric pieces together.
Wooden dowel or branch: This will serve as the base for hanging your textile art.
Twine or cord: Used to hang the fabric art from the dowel or branch.
Iron and ironing board: You may need to iron the fabric to remove wrinkles and ensure smooth edges.
Optional: Fringed trim, beads, or embellishments for added texture.
Instructions
Step 1: Choose and Prepare Your Fabric
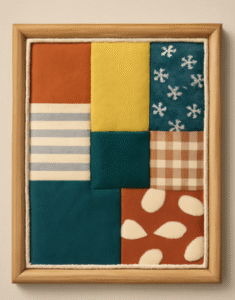
Gather a variety of fabric pieces in different colors and textures. Choose textiles that have different weights and patterns to add visual interest to your artwork.
Cut the fabrics into geometric shapes, strips, or any design you prefer. The pieces should be sized to fit within your intended design for the wall hanging.
Step 2: Arrange the Fabric Pieces
Lay out the fabric pieces on a flat surface. Experiment with the arrangement until you’re happy with how the fabrics look together. You can arrange them in a grid, stripes, abstract patterns, or any layout that fits your vision.
Once you are satisfied with the design, take a photo for reference so you can recreate the layout.
Step 3: Attach the Fabric Pieces
Apply fabric glue to the back of each piece of fabric, then press them onto a backing material (such as a canvas, a piece of old fabric, or even an upcycled old towel) to form your design.
Allow the glue to dry completely before moving on to the next step. If needed, iron the fabric pieces to ensure smooth edges.
Step 4: Add Embellishments (Optional)
For a more decorative touch, you can add fringed trim along the edges of the fabric or sew beads into the design. This adds extra texture and visual appeal to your wall art.
You can also paint or add other creative elements to the textile for additional personalization.
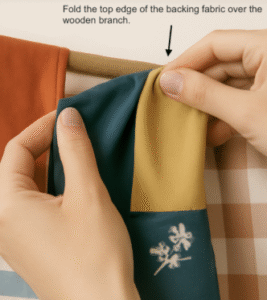
Step 5: Attach the Dowel and Hang the Art
Once the fabric pieces are securely glued and the art is dry, fold the top edge of the backing fabric over the wooden dowel or branch.
Use fabric glue to bond the fold in place or secure it with strong adhesive tape.
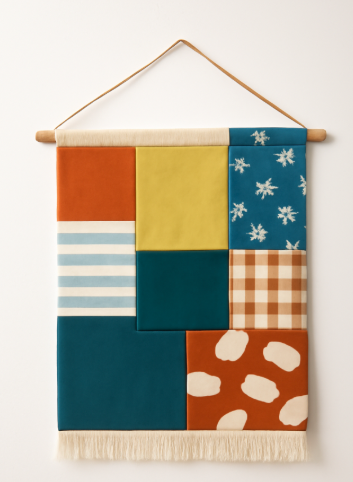
Attach twine or cord to both ends of the dowel for hanging.
Step 6: Display Your Artwork
Hang your new fabric-based art on a wall using nails or hooks, ensuring the design is centered and hangs evenly.
Upcycling Tips & Tricks
Repurpose Old Clothing: Give new life to worn-out shirts, dresses, or jeans by cutting them into strips. These make excellent, character-rich additions to your table runners and placemats.
Mix Fabrics: Don’t be afraid to experiment. Combining different textures, patterns, and colors creates a vibrant, boho-inspired look that makes every piece one of a kind.
Personalize: Add a personal touch with hand-stitched initials, meaningful quotes, or seasonal motifs. It’s a great way to make your upcycled pieces even more special.
This article is part of our Textile Upcycling Series. For more creative ways to repurpose fabric waste, visit Waste Free ’23 University – Section 7.